 |
 |
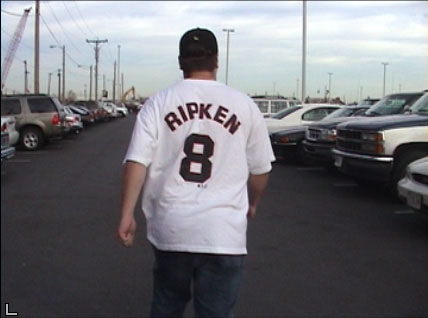
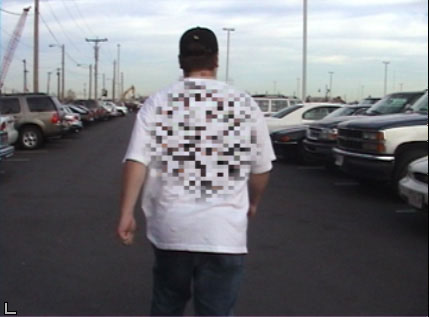
| Unfiltered Image | Filtered Image |
Overview
The Witness Protection filter allows you to track the motion of an object in a media file. You can then use the motion path data to control another aspect of the effect. For example, track a logo on a t-shirt and use a blur to obscure it. You can apply a mosaic, blur, tint or brightness/contrast effect to the specified area.
Function
The steps below provide an overview of the Witness Protection process.
-
Choose the appropriate effect from the Effect Method menu and use the parameters in the Effect parameter groups to set up your effect.
-
Use the parameters in the Mask parameter group to set up the region that you want to affect. Region Radius sets the size of the area while Stretch/Direction sets the shape. Setting the View Mask menu to Chosen Pixels or Mask Unchosen Pixels can help you to finetune the area.
-
Use the parameters in the Motion Tracker parameter group to setup the Target. The Target indicates the area in the media to track. You should manually set up both the first and last keyframe.
A good tracking region contains a high-contrast object with good vertical and horizontal edge definition. Ideally, you should find a pattern that is visible in every frame.
- Analyze the motion by selecting the Track On-The-Fly checkbox and clicking Play.
The filter generates tracking data. While the filter is tracking, the effect is not displayed.
- Manually correct any errors. See “Manually correcting Errors”at the end of this document for details.
Presets and Common Controls
BCC filters come with a library of factory installed presets plus the ability to create your own custom presets and preview them with the BCC FX Browser™.
BCC filters also include common controls that configure global effect preferences and other host-specific effect settings.
For more information about working with presets and other common controls, Click Here.
Effect Parameter Group
The Effect Method menu determines what sort of effect is applied to the specified area. The controls in the Effect parameter group let you adjust the effect.
- When Blur is chosen, Amount/Brightness sets the amount of blur. Contrast/Scramble, Seed and the Color controls have no affect when Blur is chosen.
- When Mosaic is chosen, Amount/Brightness sets the amount of pixelation along the horizontal and vertical axis. Increasing these values reduces the number of pixels used to create the image. Contrast/Scramble shuffles the pixels in the image. As Scramble increases, the arrangement of pixels becomes increasingly random. Seed determines which value is input to the random number generator used to scramble the pixels. Adjust this value when you like the overall effect but want to adjust the random configuration of the pixels. See the BCC Mosaic filter for illustrations of these parameters. The Color controls have no affect when Mosaic is chosen.
- When Bright-Contrast is chosen, Amount/Brightness sets the amount of brightness. Contrast/Scramble sets the amount of Contrast in the image. Seed and the Colorcontrols have no affect when Brightness/Contrast is chosen.
- When Tint is chosen, Amount/Brightness sets the amount of the chosen Color that is applied. Contrast/Scramble and Seed have no affect when Tint is chosen.
When the Process Alpha checkbox is selected, if the clip includes an alpha channel, the effect will apply to the alpha edges as well. This is useful if you are working with a title or matte or have applied multiple filters and some include an alpha channel.
The Apply Mode menu controls how the chosen effect is composited with the filtered layer. For descriptions of all the Apply Modes, Click Here.
Apply Mix controls the mix of the specified Apply Mode with the Normal apply mode. If the Apply Mode is Normal, Apply Mix has no affect. If Apply Mix is 0, Apply Mode has no affect. Increase Apply Mix to blend the Apply Mode setting with the Normal apply mode.
Mix with Original blends the source and filtered images. Use this parameter to animate the effect from the unfiltered to the filtered image without adjusting other settings, or to reduce the effect of the filter by mixing it with the source image.
Mask Parameter Group
- Note: When setting up your mask, you may want to set the View Mask menu to View Chosen Pixels or Mask Unchosen Pixels so that you can easily see the masked area.
The Offset X and Offset Y parameters, allow you to offset the effect on the X and Y axis respectively. This is useful if you want to track one area, then apply the effect to a different area. For example, you want to blur out an athlete’s name on a t-shirt but don’t want to blur the player’s number. However, the player’s number offers more contrast and is therefor easier to track. You would track the number, then offset the effect to obscure the name.
Region Radius sets the size of the oval-shaped region where the effect is applied.
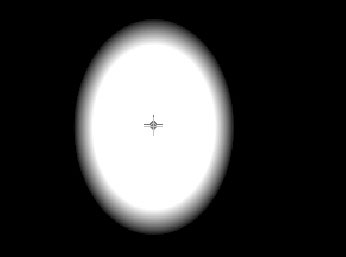
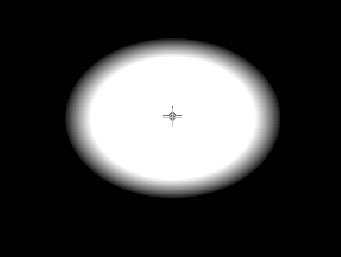
Stretch/Direction distorts the oval-shaped region by stretching it either horizontally (for positive values) or vertically (for negative values). The following examples show the View Mask menu set to View Chosen Pixels.
 |
 |
| Stretch/Distortion=-10 | Stretch/Distortion=10 |
Softness controls the softness of the edges of the mask created by the filter. A setting of 0 produces a sharply defined hard edge. Increasing Softness produces softer edges.
When the Invert checkbox is selected, the mask created by the filter is inverted. For example, you want to highlight a face in a crowd. You could track the face, apply a Brightness- Contrast filter then darken the crowd except for the specified area.
The View Mask menu offers several display options which help you to finetune your effect.
- Output displays the filtered effect.
- Chosen Pixels displays the matte created between the filtered and unfiltered pixels in black and white. The black regions of the matte represent the unfiltered pixels, and the white regions of the matte represent the filtered pixels. Gray areas represent partially filtered pixels. This is useful for adjusting an area that is difficult to see, for example a subtle Blur filter applied to a region.
- Mask Unchosen Pixels displays a 50% red mask over the unfiltered pixels. This is also useful for adjusting an area that is difficult to see, for example a subtle Blur filter applied to a region.
- Source Image shows the source of the matte.
Motion Tracker
The BCC Motion Tracker allows you to track the motion of an object, then use the motion path to drive other geometric properties of the effect without the need for keyframing.
For more information on the Motion Tracker, Click Here.
Motion Tracker Parameter Group
Selecting the Reset Tracker button resets the parameters in the Motion Tracker group.
The Tracking Source Layer menu allows you to set the layer to track. By default the filtered layer is used.
When the Track On-the-Fly checkbox is selected and you press Play, the filter calculates the tracking data. When you select this checkbox, the selected effect does not display in the Composer window. Once you finish tracking, deselect this checkbox to play the applied effect.
The Tracker Center KF controls set up the area to track. However, in general it is easier to use the onscreen point controls to set this up. Then use the position controls for finetuning.
Target Size sets the size of the area to track. Increasing this value increases preview time but can increase the accuracy of the tracking.
Tips for Setting Up the Target Area
- A good Target area contains a high-contrast object with good vertical and horizontal edge definition. Ideally, you should find a pattern that is visible in every frame.
- The Target Width should be large enough to accommodate a good target image. However, processing time increases as the size increases, so do not make the Target Width unnecessarily large.
- If your image does not contain a high-contrast object to track, apply the BCC Unsharp Mask or BCC Brightness Contrast filter to the Source track to increase the contrast for better results.
- You can work in Draft mode to preview. However, if the tracker fails repeatedly, you may have to work at full quality.
Manually Correcting Errors
If the Witness Protection filter cannot locate the Target region during analysis, errors can occur. You can use one of these methods to finetune your results:
- Select the Reset Tracker button. Refine your Target region. Reanalyze the motion by selecting the Track On-The-Fly checkbox and clicking Play.
- You can manually correct the tracking by creating a new keyframe at the point where the tracking fails. Manually reposition the Position Point at this keyframe. Then select the Track On-The-Fly checkbox and click Play to resume tracking from that point.
