< Previous | Contents | Manuals Home | Boris FX | Next >
Basic Shot Settings
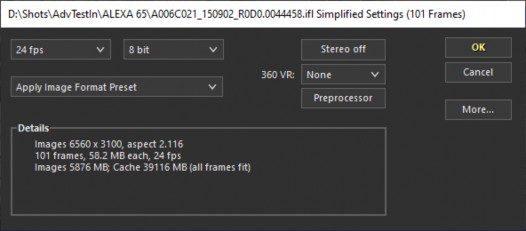
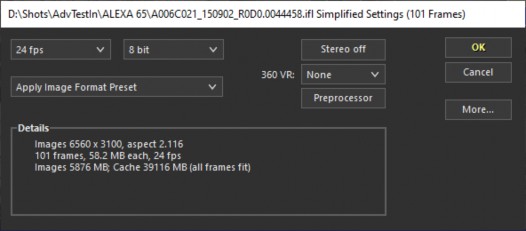
By default, when you open a new shot, a simplified shot settings panel appears:

If it is a sequence, you should be sure to adjust the frame rate. The default pixel aspect ratio is assumed to be 1:1; you should check the aspect ratio also if the shot is anamorphic or on an older camera with non-square pixels. You can select the number of bits per channel here, as well as initiate stereo and 360VR processing.
For many additional controls, click the More… button, or later click the Shot/Edit Shot menu item. Don’t be dismayed if you don’t understand all the settings to start; many are provided for advanced situations only. We'll describe only the most common ones here. There's more information in the Shot Settings in the reference portion of the manual.
The Image Aspect is the single most important setting to get right. If it's not right, your 3-D solve will be distorted. Maya users may want to use a preset corresponding to one of the Maya presets.
The Max RAM Cache GB preference in the Image Input section is worth checking on. It doesn't affect tracking or solving accuracy—it affects performance, how many frames will fit in RAM. With enough RAM, this will be the whole shot. You may want to decrease this value if there are other large apps running, or increase it a bit if there are none. (The SynthEyes Intro version is limited to 1.25 GB, about 200 HD frames.)
Note that the Image Preprocessor button brings up another panel with additional possibilities; we’ll discuss those after the basic open-shot dialog.

The following is a condensed listing of the reference material:
Start Frame, End Frame: the range of frames to be solved, within the overall shot you are opening. You can adjust this from this panel, or by shift-dragging the end of the frame range in the time bar.
Stereo Off/Left/Right . Sequences through the three choices to control the setup for stereo shots. Leave at Off for normal (monocular) shots, change to Left when opening the first, left, shot of a stereo pair. See the section on Stereoscopic shots for more information.
360 VR Mode. Used to declare that the footage is 360 degree spherical Virtual Reality footage, with additional options for converting to and from 360 VR.
Time-Shift Animation . Causes all the tracking and animation to be shifted earlier or later, to compensate when the shot is changed to a new one with frames added or removed from the beginning.
Frame rate: Usually 23.976, 24, 25 or 29.97 frames per second. NTSC is used in the US & Japan, PAL in Europe. SynthEyes does not care whether you use an exact or approximate value, but it may be crucial for downstream applications, especially when the shot is a 'movie' file, rather than a sequence.
Interlacing: No for film or progressive-scan DV. Yes to stay with 25/30 fps, skipping every other field. Minimizes the amount of tracking required, with some loss of ability to track rapid jitter. Use Yes, But for the same thing, but to keep only the other (odd) field. Use Starting Odd or Starting Even for interlaced video,
depending on the correct first field. Guessing is fine. Once you have finished opening the shot in a second, step through a few frames. If they go 2 steps forward, one back, select the Shot/Edit Shot menu item, and correct the setting. Use Yes or None for source video compressed with a non-field-savvy codec such as JPEG sequences.
Channel Depths: Process and Store. 8-bit/16-bit/Half/Float. Radio buttons. You can select different depths for intermediate processing in the image processor, and storage in the RAM cache. The selection marked with an asterisk is the default, based on the source imagery, though this may change as you select different options.
+Alpha. Button. Click this to add a separate alpha image sequence to the shot. Click the button, cancel the file selector, then answer Yes to remove the alpha sequence. Button is blue when a sequence has been explicitly selected. Note that sequences can also be attached implicitly, if their names match the Separate-alpha suffix preference.
Keep Alpha: when checked, SynthEyes will keep the alpha channel when opening files, even if there does not appear to be a use for it at present (ie for rotoscoping).
Alpha data can be in the RGB files, ie RGBA, or in separate alpha-channel files, see Separate Alpha Channels. Turn on when you want to feed images through the image preprocessor for lens distortion or stabilization and then write them, and want the alpha channel to be processed and written also.
Apply Preset: Click to drop down a list of different film formats; selecting one of them will set the frame rate, image aspect, sensor (back plate) width, squeeze factor, interlace setting, rolling shutter, and indirectly, most of the other aspect and image size parameters. You can make, change, and delete your own local set of presets using the Save As and Delete entries at the end of the preset list.
Pixel Aspect: width to height ratio of each pixel in the overall image. (The pixel aspect is for the final image, not the skinnier width of the pixel on an anamorphic negative.)
Anamorphic Squeeze. Enter any anamorphic squeeze value applied by the lens, for example 2 for a lens that squeeze the lens horizontally by a factor of 2. Used in lens distortion processing. The squeeze will often be the same as the pixel aspect ratio, but not necessarily. For example, shots with an anamorphic lens ratio of 2 are commonly resampled to have square pixels (pixel aspect = 1.0), but it is still important to have keep the Squeeze value at 2.0 in that case. Set the squeeze first, then adjust the pixel aspect ratio as needed.
2.0. Button. Sets the Anamorphic Squeeze and Pixel Aspect to 2.0, and toggles them back to 1.0 if clicked again. Helps speed anamorphic shot setup.
Sensor Size (width and height): Sets the width of the “film” or sensor of the virtual camera, which determines the interpretation of the focal length. You must know this if you want to use focal lengths. SynthEyes uses field of view, so this value
does not affect the solve. Note that the real values of focal length and sensor (back plate) width are always slightly different than the “book values” for a given camera. Use Sensor Units to change the desired display units.
Sensor Aspect. Convenience spinner showing the sensor’s aspect ratio; adjusting this changes the sensor height.
Rolling Shutter Enable/Fraction . Checkbox and spinner. Enables and configures rolling-shutter compensation during solving for the tracker data of the camera and any objects attached to this shot. CMOS cameras are subject to rolling shutter; it causes intrinsic image artifacts. A value set here overrides any in the solver, and prevents the solver from recalculating it.
Image Preprocessor: brings up the image preprocessor dialog, allowing various image-level adjustments to make tracking easier (usually more so for the human than the machine). Includes color, gamma, etc, but also memory-saving options such as single-channel and region-of-interest processing. This dialog also accesses SynthEyes’ image stabilization features.
Memory Status: shows the image resolution, image size in RAM in megabytes, shot length in frames, and an estimated total amount of memory required for the sequence compared to the total still available on the machine. Note that the last number is only a rough current estimate that will change depending on what else you are doing on the machine. The memory required per frame is for the first frame, so this can be very inaccurate if you have an animated region-of-interest that changes size in the Image Preprocessor system. The final aspect ratio coming out of the image preprocessor is also shown here; it reflects resampling, padding, and cropping performed by the preprocessor.
©2024 Boris FX, Inc. — UNOFFICIAL — Converted from original PDF.
