< Previous | Contents | Manuals Home | Boris FX | Next >
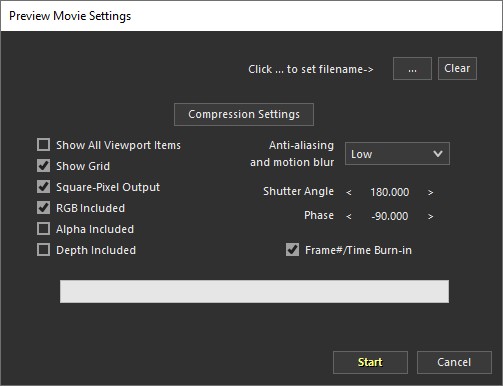
Preview Movie Settings Dialog
Launched from the Perspective view's right-click menu with Preview Movie.
Controls where the movie goes, what format it is, and what is shown.
The current “playback range” (delimited by the small green & red markers in the Time bar) will be output, unless the perspective view is not showing the Active Tracker Host’s shot. If it’s showing a different shot with a different frame range, the playback range is nonsensical, and the entire shot is output.
The preview is made at the resolution of the original footage, not of the perspective viewport. In the case of left-over-right stereo display, the height will be double the original.
Use "Preview Movie" for previewing tracking insertions—if you need to produce modified versions of original plates, ie with lens distortion removed, use the Output tab of the image preprocessor instead.

File name/… Select the output file name to which the movie should be written.
ASF(Win), AVI(Win), BMP, Cineon, DPX, JPEG, MP4(Win), MOV (Quicktime), OpenEXR, PNG, SGI, Targa, TIFF, or WMV(Win). Only image sequences are available on Linux. For image sequences, the file name given is that of the first frame; this is your chance to specify how many digits are needed and the starting value, for example, prev1.bmp or prevu0030.exr. The default extension is set in Image Output preferences.
Clear. Clears the file name. In some circumstances when a file is moved from one operating system to another, your current operating system may not be able to display its file picker at all if the existing file is from a different OS. If that happens, use the Clear button, and then the ... picker.
Compression Settings. Set the compression settings for Quicktime and various image formats. Since the compression settings depend on the type of file being produced, you must set the file name first. Note that different codecs can have their own quirks! The default is set in Image Output preferences.
Show All Viewport Items. . When checked, produces a literal rendition of the perspective view. Includes all the trackers, handles, etc, shown in the viewport as part of the preview movie.
Show Grid. When checked, includes the main perspective-view grid, ie typically the ground plane. This checkbox is irrelevant if the Show All Viewport Items checkbox is checked, as in that case whether the grid is shown or not depends on the normal grid settings in the perspective view's right-click menu.
Square-Pixel Output. When off, the preview movie will be produced at the same resolution as the input shot. When on, the resolution will be adjusted so that the
pixel aspect ratio is 1.0, for undistorted display on computer monitors by standard playback programs.
RGB Included. Must be on to see the normal RGB images. See below.
Alpha Included. Currently supported for EXR, PNG, SGI, TGA, TIF, ProRes™ 4444/4444 XQ MOV. Turn off right-click/View/Show Image so the shot doesn't cover the entire image.
Depth Included. Output a monochrome depth map. See Depth Maps .
Anti-aliasing and motion blur. Select None, Low, Medium, High, or Moblur Low, Moblur Medium, Moblur High, or Moblur Max to determine the amount of antialiasing and optionally motion blur.
Shutter Angle. Shutter angle 0..360°, equivalent to an exposure time of 0..1 frames.
Unlike most other settings on this panel, it is saved in the scene for this particular camera/shot.
Shutter Phase. Shutter phase, where the exposure time starts with respect to the stated position/orientation/field of view for a given frame. It should normally stay centered, ie at minus one half the Shutter Angle. For example, -90 ° corresponds to starting a quarter of the way from the current frame back in time to the previous frame. Like the Shutter Angle, this is stored for each camera/shot.
Frame#/Time Burn-in. When on, the frame#, timecode, or timestamp will be burned into the preview movie output. This checkbox is a handy reminder and easy access to the normal settings from the Perspective view’s right-click/View/Time burn-in submenu.
The allowable output channels depend on the output format. Quicktime accepts only RGB. Bitmap can take RGB or depth, but not both at once. OpenEXR can have either or both.
©2024 Boris FX, Inc. — UNOFFICIAL — Converted from original PDF.
