< Previous | Contents | Manuals Home | Boris FX | Next >
Quick Start: Automatic Tracking
To get started quickly with SynthEyes, match-move the demo shot FlyoverJPEG , downloaded from https://www.ssontech.com/download.html . Unpack the ZIP file into a folder containing the image sequence.
An overview of the tracking process looks like this:
- Open the shot and configure SynthEyes to match the source
- Create 2-D trackers that follow individual features in the image, either automatically or under user supervision.
- Analyze (solve) the 2-D tracks to create 3-D camera and tracker data.
- Set up constraints to align the solved scene in a way useful for adding effects. This step can be done before solving as well.
- Export to your animation package.
Start SynthEyes from the shortcut on your desktop, and on the main menu select File/New or File/Import/Shot. In the file-selection dialog that opens, elect the first frame, FLYOVER0000.JPG, of the shot from the folder you have downloaded it to.
The shot settings panel will appear. By default this will be the simplified settings, though you can click More… to get many more settings (or turn off the simplified dialog altogether from the preferences).
Note : Screenshots in this manual and online tutorials are usually from Windows; the macOS and Linux interfaces are slightly different in appearance due to different fonts and window close buttons, but not function. The user interface colors and other minor details in the manual and tutorials may be from older SynthEyes or operating system versions or have different preferences settings. (There are many user-configurable elements.) And the layout changes based on the size of the SynthEyes window—if full screen, based on your monitor resolution. So just go with the flow and look around if need be!
Tip : The Max RAM Cache GB preference controls how much RAM will be used to cache the shot for fastest access. See Opening the Shot for more information.
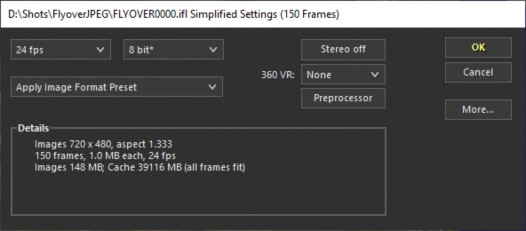
You can reset the frame rate from the 24 fps default for sequences to 29.97 from the frame rate dropdown, though this is not critical. The aspect ratio, 1.333 (ie 4:3) is correct for this shot.
On the top room selector,
![]()
verify that the ![]() Summary tab is selected.
Summary tab is selected.
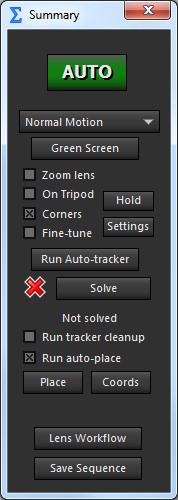
On the summary panel, click the ![]() Auto button for full-automatic processing.
Auto button for full-automatic processing.
Time Saver: you can click Auto as soon as you start SynthEyes, and it will prompt you for the shot if you have not set one up already, so you do not even have to do a File/New.
If this is the first time you've done a full-automatic solve, and hopefully it is, you'll see the following dialog:
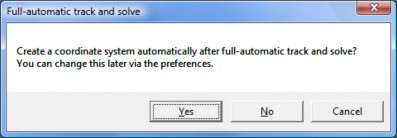
So that you can learn match-moving better, answer No for now. You can adjust this later via the "Autoplace after solving" preference in the Solver section of Edit/Edit Preferences. You can also change with an automatic placement is generated for a specific scene via the checkbox on the Summary panel.
A series of message boxes will pop up showing the job being processed. Wait for it to finish. This is where your computer’s speed pays off. On a 2010 Mac Pro, the shot takes about a second to process in total, including portions before this dialog. A 2011 MacBook Air takes about 3 seconds.
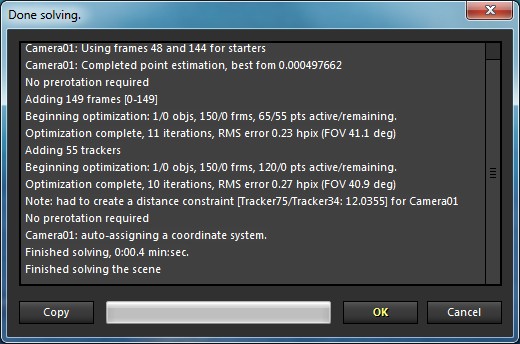
Once you see Finished solving, hit OK to close this final dialog box. SynthEyes will switch to a five-viewport configuration that continues to show the solver results. (Experienced users can disable switching with a preferences setting).
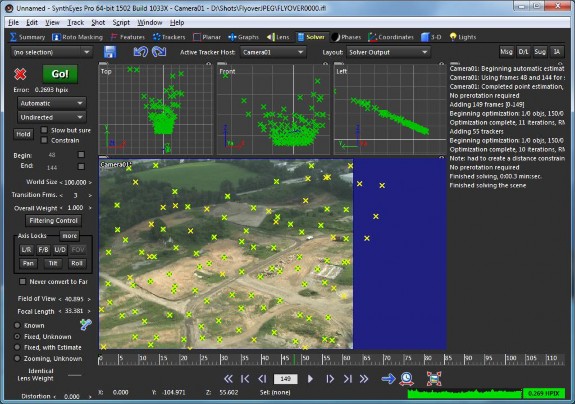
Tip : don't worry if it looks like some controls are cut off the bottom of the control panel at left. You're not missing anything. Those are secondary copies of the controls found on the Lens panel. On a big screen they're all visible.
On the main toolbar, change "Layout: Solver Output" to "Quad" to change to a conventional view that is better suited for small screens.
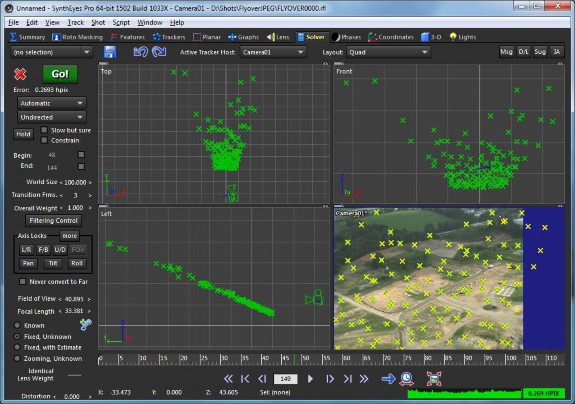
You'll see many trackers: in the camera view, a green diamond shows the 2-D location in the image on the current frame, and a small yellow x (tracker point) shows its location in 3-D space. In the 3-D views, the green x's show 3-D tracker locations.
You can zoom in on any of the views, including the camera view(s), using the middle mouse scroll and middle-mouse pan to see more detail. (You can also right-drag for a smooth zoom.)
If you are trying to use a laptop trackpad, or are having other problems using the middle-mouse button, please see the section on Middle Mouse Button Problems. Note that tracking is an intensive high-precision task; trackpads are designed only for basic browsing and word processing, so an external mouse is highly recommended for all but the most trivial 3-D tracking.
The status line will show the zoom ratio in the camera view, or the world-units size of any 3-D viewport. You can Control-HOME to re-center all four viewports. See the Window Viewport Reference for more such information.
The error curve mini-view at bottom right shows color-coded tracking error over the length of the shot, and an overall value.
In the main viewports, look at the Left view in the lower left quadrant. The green marks show the 3-D location of features that SynthEyes located. In the Left view, they fall on a diagonal running top-left to lower-right. [If the points are flat on the ground plane, you previously enabled the automatic placement tool; you can still continue with this tutorial.] The trackers are located relative to the initial default camera position: the
images contain NOTHING to say that the trackers should be located anywhere in particular in the scene. You can move the camera and trackers all around in 3D, and everything will still line up perfectly in the camera view (and SynthEyes gives you a manual alignment method to do exactly this).
Since most of these points are on the ground in the scene, we’d like them to fall on the ground plane of the animation environment. SynthEyes provides tools to let you eyeball it into place, or automatically place it, but there’s a more accurate way…
Switch to the ![]() Coordinates
room. The
coordinate system panel is used to align and scale the solved scenes. (Note that the behavior is a little different depending on whether you click on the icon or the text: clicking on the text name of a room updates both the panel and view configuration, if needed, while clicking on the
icon changes only the panel, not the view configuration.)
Coordinates
room. The
coordinate system panel is used to align and scale the solved scenes. (Note that the behavior is a little different depending on whether you click on the icon or the text: clicking on the text name of a room updates both the panel and view configuration, if needed, while clicking on the
icon changes only the panel, not the view configuration.)
Refer to the picture below for the location of the 3 trackers labeled in red. We will precisely align these 3 trackers to become the ground plane. Note that the details of which trackers are present may change somewhat from version to version.
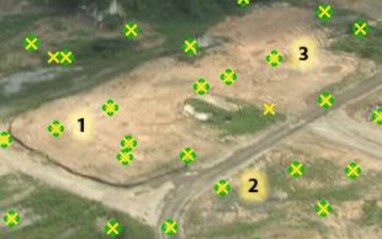
Begin by clicking the *3 button ![]() at top right of the coordinate system panel. Next, click on the tracker labeled 1 (above) in the viewport. On the control panel, the tracker will automatically change from
Unconstrained to Origin.
at top right of the coordinate system panel. Next, click on the tracker labeled 1 (above) in the viewport. On the control panel, the tracker will automatically change from
Unconstrained to Origin.
In this example, we will use trackers (1 and 2) aligned left to right. The coordinate system mini-wizard (*3 button) handles points aligned left to right or front to back. (By default, it is LR, you could click again to get FB.)
Click the tracker labeled 2, causing it to change to Lock Point . The X field above it will change to 20.
Select the tracker labeled 3, slightly right of center. A dialog box will appear that we'll discuss in a moment. The tracker's settings will have already changed from Unconstrained to On XY Plane (ie the ground plane).
Why are we doing all this? The choice of trackers to use, the overall size (determined by the 20 value above), and the choice of axes is arbitrary, up to you to
make your subsequent effects easier. See Setting Up the Coordinate System for more details on why and how to set up a coordinate system. Note that SynthEyes’ scene settings and preferences allow you to change how the axes are oriented to match other programs such as Maya or Lightwave: ie a Z-up or Y-up mode. This manual’s examples are in Z-Up mode unless otherwise noted; the corresponding choices for one of the Y- Up modes should be fairly evident.
After you click the third tracker you will be prompted (“Apply coordinate system?”) to determine whether the scene should be re-solved to apply your new settings. Select Yes. SynthEyes changes the solving mode (on the Solver panel) from Automatic to Refine , so that it will update the match-move, rather than recalculating from scratch.
SynthEyes recalculates the tracker and camera positions in a flash; click OK on the solving console that pops up.
Afterwards, the 3 trackers will be flat on the ground plane (XY plane) and the camera path adjusted to match, as shown:
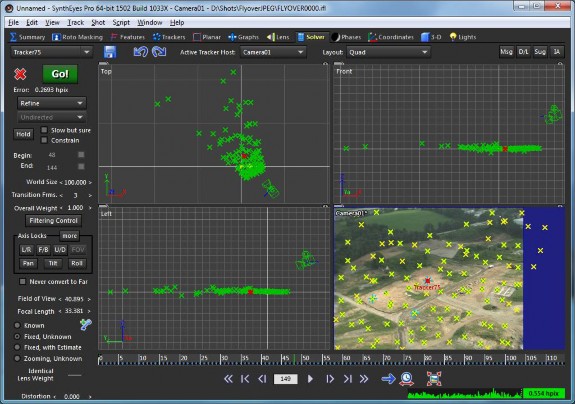
You could have selected any three points to define the coordinate system this way, as long as they aren’t in a straight line or all bunched together. The points you select should be based on how you want the scene to line up in your animation package.
Switch to the ![]() 3-D tab . Select the magic wand tool
3-D tab . Select the magic wand tool
![]() on the panel. Change the mesh type drop-down at left of the wand to create a
Pyramid instead of a Box.
on the panel. Change the mesh type drop-down at left of the wand to create a
Pyramid instead of a Box.
Zoom in the Top viewport window so the tracker points are spread out.
In the Top viewport, drag out the base of a rectangular pyramid. Then click again and drag to set its height. Use the move
![]() , rotate
, rotate ![]() , and scale
, and scale ![]() tools to make the box into a small pyramid located in the vacant field. Click on the color swatch
tools to make the box into a small pyramid located in the vacant field. Click on the color swatch
![]() under the wand, and select a sandy pyramid color. Click somewhere empty in the viewport to unselect the pyramid (bright red causes lag in LCDs).
under the wand, and select a sandy pyramid color. Click somewhere empty in the viewport to unselect the pyramid (bright red causes lag in LCDs).
On the
View
menu, turn off Show Trackers and Tracker Appearance
/Show 3-D Points, and switch to the camera viewport. You can do that by changing the Layout selector
![]() on the toolbar to Camera, or by clicking the tab
on the toolbar to Camera, or by clicking the tab
![]() at top right of the camera view itself.
at top right of the camera view itself.
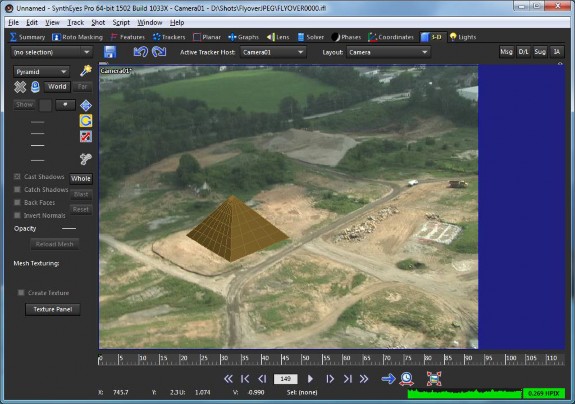
Hit Play ![]() . If it plays too quickly, select View/Normal Speed. Note that there will appear to be some jitter because drawing is not anti-aliased. It won’t be present when you render in your 3-D application. SynthEyes is not intended to be a rendering or modeling system; it operates in conjunction with a separate 3-D animation application. (You can create motion-blurred anti-aliased preview movies from the
Perspective
window.)
. If it plays too quickly, select View/Normal Speed. Note that there will appear to be some jitter because drawing is not anti-aliased. It won’t be present when you render in your 3-D application. SynthEyes is not intended to be a rendering or modeling system; it operates in conjunction with a separate 3-D animation application. (You can create motion-blurred anti-aliased preview movies from the
Perspective
window.)
Hit Stop ![]() . Rewind to the beginning of the shot (say with shift -A).
. Rewind to the beginning of the shot (say with shift -A).
By far, the most common cause of “sliding” of an inserted object is that the object has not been placed at the right vertical position (height) over the imagery. Sliding is a
user error, not a software error. You should compare the location of your insert to that of other nearby trackers, in 3-D, adding a tracker at key locations if necessary. You will also think you have sliding if you place a flat object onto a surface that is not truly flat.
Normally we would place the pyramid more carefully.
Tip : it can be difficult to assess an insert when the shot itself is unstable. To help, click to select a tracker near your insert. Hit the 5 key to turn on "Pan To Follow." The camera view will center on this tracker as you play. Zoom the view to see even better. Click 5 again to turn this mode off.
To make a preview movie, switch to the Perspective window on the View selector. Click Lock on the right of the toolbar in the perspective view, or right-click in the view and select Lock to Current Cam. Right-click in the view and select Preview Movie.
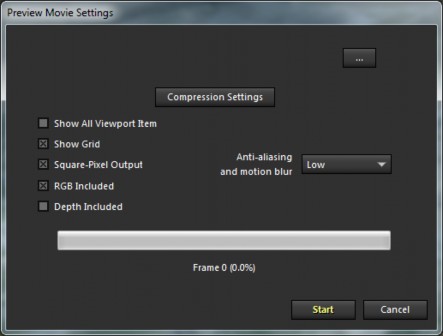
Click on … at upper right and change the saved file type to Quicktime Movie or MP4. Enter a file name for the output movie, typically in a temporary scratch location. Click on Compression Settings and select something appropriate. Click OK to close the compression settings. Back on the Preview Movie Settings, turn off Show Grid, and hit Start. The preview movie will be produced and played back in the Quicktime or Windows Media Player.
You can export to your animation package at this time, from the File/Export menu item. Select the exporter for your animation package from the (long) menu list. SynthEyes will prompt for the export location and file name; by default a file with the same name as the currently-open file (flyover in this case), but with an appropriate file extension, such as .fbx for a Filmbox file. See the link above (to the section on
exporting) for more application-specific details, generally the defaults will be a good start.
You can have SynthEyes produce multiple exports in one operation using the multi-export configuration dialog.
Note : the SynthEyes Demo version only exports the first ten frames and last frame of the sequence. You can only learn SynthEyes from within SynthEyes. Use Preview Movie to see the entire shot within SynthEyes, including your own imported models.
You can save your tracked scene now (or at any earlier time) using File/Save. If you have auto-save turned on, you will be prompted at the first completion of the save interval to specify a file name.
This completes this initial example, which is the quickest, though not necessarily the best, way to go. You’ll notice that SynthEyes presents many additional views, controls, and displays for detecting and removing tracking glitches, navigating in 3-D, handling temporarily obscured trackers, moving objects and multiple shots, etc.
In particular, after auto-tracking and before exporting, you should always check up on the trackers, especially using Clean Up Trackers and the graph editor, to correct any glitches in tracking (which can result in little glitches in the camera path), and to eliminate any trackers that are not stable. For example, in the example flyover, the truck that is moving behind the trees might be tracked, and it should be deleted and the solution refined (quickly recomputed).
SynthEyes also offers an automated tool for setting up a coordinate system: the
Place button on the ![]() Summary panel. If you click it now, it will replace the coordinate system you have already set up, without affecting the apparent size and placement of the pyramid (the pyramid can be left untouched if you turn off Whole affects meshes on the viewport's right-click menu). Although it is quick and easy, the Place button does not offer the same accuracy as the three-trackers method (which itself is quite quick). The Place button can be run automatically from the AUTO track and solve button, if the corresponding preference is turned on.
Summary panel. If you click it now, it will replace the coordinate system you have already set up, without affecting the apparent size and placement of the pyramid (the pyramid can be left untouched if you turn off Whole affects meshes on the viewport's right-click menu). Although it is quick and easy, the Place button does not offer the same accuracy as the three-trackers method (which itself is quite quick). The Place button can be run automatically from the AUTO track and solve button, if the corresponding preference is turned on.
See Realistic Compositing for 3-D for information about how to make things you add to the scene look like they belong there.
©2024 Boris FX, Inc. — UNOFFICIAL — Converted from original PDF.
